Tuesday, June 21, 2011

Samples

I'm back in Reno right now, only for a week. I've got a lot to cram in between babysitting my nieces and nephew to be, hashing out wedding dress details with my wonderful big sis, getting engagement pics taken, and figuring out a million wedding details because this is all the time I have to get Brian's opinions on things before I go back to Lincoln to do pretty much everything done for the wedding in the mere 2 1/2 weeks of actual planning/getting things done time I have left.

To kick start this big week of decisions, I made some samples of different food ideas and set up a little preview of what the reception will be like for Brian and his family to try out when they cake to pick me up. There are some tweaks needed for a few of the recipes, but the only one that was a definite no was the salted orange caramel shortbread recipe. It seems to be popular right now, but I must admit, I am not a fan of salted caramel. At least not how this recipe did it. It seemed so promising too, but the salt was all you could taste. There may be some hope yet, at least for the carmel shortbread idea, but the salt needs to be cut in half at least.


Monday, June 20, 2011

1 Year

Wow, I can't believe it. Today it's been exactly one year since I very first started this blog. I know some people have hundreds of followers within a few weeks, but I kind of needed to practice and get used to blogging first. Well, today's the day, I'm going to start commenting on other blogs, linking up with buttons, joining flickr groups, and see if anyone likes my blog. It's kind of a weird thing, I feel like I'm going to my first day of a new school and trying to make friends all over again. I've never been one to reach out and try to be popular though, I usually sit in a corner and hope someone wants to come say hi to me. But I'm having a lot of fun blogging, and I want to be better at it and hopefully even meet some of the amazing people out there in the blog world. So thank you to my 8 faithful followers, especially the 2 or three who might actually read this occasionally, and wish me luck!

So, for any new visitors who might stop by and any old friends who want to know why I started this blog, here's a bit about me:

Hi. My name is Kelli, and I want to be a blogger. I want to be a great seamstress and share tutorials for the cutest things you've ever seen, but I've only used my sewing machine about 3 times in the last year. I want to be a fashionista with tips on all the hottest trends, but my closet is full of nothing but thrift shop finds and hand-me-downs. I want to be an interior designer inspiring amazing rooms, but I lived in a neon green and baby pink room for half of my life. I want to be a world class chef with magnificent techniques and recipes, but I'm barely a cook and my experiments fail at least as often as they work. I want to be an adorable momma telling you hilarious anecdotes about my cute kiddos, but I'm just an auntie who's not nearly ready to think about that yet. The truth is, I'm not much of anything yet, and I don't have much of anything to share, but I love doing everything and anything, and I'm setting out to learn all about this big wide world and all it has to offer. So come along with me and join in my crazy adventures, or just laugh at my misadventures.

Friday, June 17, 2011

72 Hours

Most 72 hour kits make for a much more cushy disaster survival, but this is the bare bones, the absolute minimum amount needed to stay alive. If you can make a more elaborate one, that's great, but this is nice and compact, perfect for a college student or young married couple without much money or space.


As long as I can remember, I have loved being prepared. It makes me feel safe and secure, knowing that whatever happens, I will be ready. As a kid I remember having a 72 hour kit—a bag filled with everything I need to survive for 72 hours, the average amount of time it takes to get rescued if you are in a disaster of some sort. Instead of making the kit then putting it in a closet and forgetting about it like most normal people (actually, most normal people probably don't have one at all) I would carry it around with me everywhere. I also had a giant purse with all of my most prized possessions in it, and all the mommy essentials that I might need in a day-to-day emergency, and my entire life savings (stay tuned for my more current super prepared mommy purse next week, even though I'm still not a mommy and won't be for a while). I was only about 6 at the time.

My brother was a pyro, and every time he would play with the fire or even just a candle, I was certain he was going to burn down the house. So I'd gather up my 72 hour kit, my purse, and my cat and sit by the mail box (our meeting spot in case of an actual fire) until he was done. One day, I was playing house with my friend in the front yard—with my purse and 72 hour kit of course—and ran inside to get something. While we were inside, we got distracted by something else, and by the time we came back outside everything was gone.

Since then, I don't think I've really had a 72 hour kit. We have a big one for our family out in the car, but I didn't have anything much for myself, especially away at college and away nannying and all that. But on a whim the other night, I had that urge to be prepared again, so I immediately went to Safeway, bought everything Brian and I would need for three days, and came home and made us our very own 72 hour kits. And if you ever feel the need to be ready for a disaster, feel free to follow along. I've never done a tutorial before, but hopefully this will be coherent enough for you to figure it out.

Milk Carton 72 Hour Kit Tutorial

1. Gather all your food.

I bought what I like and what I could find, but substitutions can definitely be made. Just make sure you stay roughly the same size and nutritional content. Me sure to try to find things with lots of protein, like a beef stew instead of tomato bisque and a nutty granola bar instead of just oats. For EACH kit, you'll need the following:

4 granola bars
1 can of soup
1 stay fresh pack of Ritz crackers
3 packets apple cider mix
4 sticks beef jerky
2 packs fruit snacks
2 packs instant oatmeal
2 packs hot cocoa
2 packs dry soup mix
14 hard candies
18 sticks of gum


Besides the Ritz crackers, I would never eat, let alone buy, any of this. But in an emergency it will have to do. And all of those chemicals in packaged food helps it last until I redo my kit next year.


Can you believe all of that actually fits in a half gallon mik carton? Well, that's because it doesn't. I had to ditch the apple juice carton.


And most importantly, a half gallon milk carton (or cream, or juice), emptied, washed, and dried. If you're actually as prepared as I'd like to be, you can plan ahead. But, if you decide to do this all in one night like me, you'll have to find somewhere to put the milk.


Lovely frothy milk. I know it tastes the same, but there's something about drinking milk from a pitcher that just feels wrong for some reason.


2. Pack your kit.

First, put in your soup can. It will be a tight fit, but it will fit. Make sure that the can is in line with the top of the carton (I don't really know how best to describe it except that the first and last pictures in the image below are at a 90º angle to each other). This will ensure that even when the carton is filled almost to overflowing, you'll still be able to close it.

Stuff the dry soup mixes in the spaces left on either side of the can, then place the ritz crackers between them. Place the oatmeal packets on one side of the carton and the cocoa and cider mix packets along the on side, push them down as far as they will go. Stack the granola bars on each other between the oatmeal and drink mixes, push them down as far as they will go. Push the hard candies into any spaces you can find around the granola bars. Put the gum on top of the granola bars and two sticks of jerky on either side of the gum. Finally, place the fruit snacks on the top and push it all down close up your carton.


It may seem like a bit much for me to give step by step instructions on packing it, but it's harder than it looks. I had to try at least 5 different ways before I could get it to fit.


Fold one edge of the top of the carton slightly over the other, and tape it up.


If it's as full as mine was, taping it closed is probably a two person job.


Print out a menu/instructions (see below) and tape it to one side of the carton. I taped along each edge then added an additional strip down the middle to make sure the whole paper was covered and somewhat protected from the elements.


Day One

Breakfast: 2 Granola Bars

Lunch: Canned Soup, 5 Ritz Crackers, & Apple Cider

Dinner: 2 Sticks Beef Jerky & Fruit Snacks

Snacks: 5 Candies, 6 Sticks of Gum


Day Two

Breakfast: Oatmeal & Hot Cocoa

Lunch: Granola Bar, 2 Sticks Beef Jerky, & Apple Cider

Dinner: Soup Mix & 6 Ritz Crackers

Snacks: 4 Candies, 6 Sticks of Gum


Day Three

Breakfast: Oatmeal & Apple Cider

Lunch: Soup Mix & 5 Ritz Crackers

Dinner: Granola Bar, Fruit Snacks, & Hot Cocoa

Snacks: 5 Candies, 6 Sticks of Gum


SAVE CAN from canned soup to mix in.

For oatmeal and soup, add to can and fill to top with water.

For cider and cocoa, add powder to can and fill halfway with water.


The 3-day menu. We'll be living like kings.


Each person will also need water to survive the three days. If you want to stick with the bare minimum, a 2-liter bottle will be just enough to make everything for your meals. If you also want some extra drinking water, it's probably best to have two 2-liter bottles for each person.


And there you have it. One beautiful, space-efficient survival kit.


P.S. Today I looked up the visiting teaching message, and it just to happened to be on self reliance. That can't just be a coincidence, can it? So I decided to be a wonderful person and selfless* friend and give the two kits I made to the lovely girls I visit teach and make new ones for Brian and I.

*Okay, so I mostly only gave them away because I already had enough of everything except the soup to make two more kits anyway. Plus, I was totally selfish and opened up the kits, dug out the yummy granola bars I had bought and replaced them with dinky ones I found in my mom's pantry. I'm a little disgusted with myself, but they're really good granola bars!

Thursday, June 16, 2011

Paper Hearts

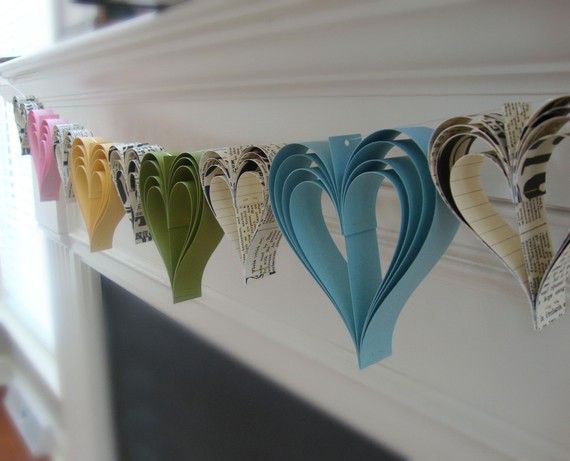
One day as I was roaming around Etsy, I stumbled on this adorable paper heart banner. It was an amazing idea, but seemed simple enough, so I filed it away in my brain as something I should try to make some time.


Now that I look at them again, I realized I forgot the strip down the middle. It does help shape them a little, but I kind of like it without, if I can find another way to hang them. Oops.


Well, now that I'm getting married, I have something to make them for.


Trying out a few styles to see what I like best.


My mom was kind enough to help me cut out a zillion strips of paper.


All glued together in neat little paper heart packets.


Trying to mix them up randomly, because it's too much effort to


A few hours and two glue sticks later, I have 50 paper hearts, ready to be strung and hung!


I love the way they turned out, I just might even do a tutorial some day.

Wednesday, June 15, 2011

Piggy Party

I feel like it's been ages since I've made a cake, I guess I just got so used to making about one a week for a while. I still haven't even posted my May cakes, because Brian has the pictures, but hopefully soon. There were some cute ones.


I learned from experience and filled the pans much less than a normal cake pan.


Yesterday I went to a "Pink Piggy Pigtail Party." I can't exactly do pigtails with my super short hair, so I thought I'd better go all out with the pink piggies. And with my wedding coming up I need to learn how to use those mini tiers, because last time didn't work out like I'd hoped.


They definitely didn't sink like last time, quite the opposite.


I used the cake recipe I used a while back for Lee's birthday cake, the first time I stepped away from a boxed mix. Mostly because I knew that I could bake it almost twice as long as it called for and it would still taste ok, so there was no way I could mess it up.


Some bakers smash down their cakes to make them flat, but I prefer to cut off the tops, because then there's some to snitch.


I tried to do the frosting for the crumb coat without a recipe. Bad idea. It was really runny, which was a little hard to spread evenly, but actually helped it to dry quickly.


I've gotten decent at cakes, now I need to work on my frosting.


Then I decked it out with a quick batch of bubblegum pink fondant.


Just a simple dotty pink cake.


I've decided I enjoy making pudgy little animals.


No piggy is complete without a curly little tail.


I even won the Pink Ribbon for the best dish at the party!


The adorable award was made by Tessa of Perfectly Precocious.

Tuesday, June 14, 2011

Project Wedding Decor

Being the thrifty crafty girl I am, I decided to do my wedding decorations myself. It helps that it's at my house and mostly outdoors, that gives the setting and feeling and a lot of decor without having to get flowers and things. Having i an open house-y reception with finger foods instead of a sit down meal means no tablecloths or centerpieces. So, my challenge is to make all of my decorations using some tissue paper and crepe paper from Dollar Tree, a few packs of cupcake holders from Walmart, and two scrapbook paper stacks I got half off at Joann. Let the DIYing begin!


Monday, June 13, 2011

Dear Ikea,

I NEED these. Honest I do. via


As a long time Ikea customer, I thank you for providing quality, stylish products at an affordable price. Items from Ikea can be found in my bedroom, bathroom, kitchen, and living room; as well as my plans for my future dream home. My fiancé and I often go to Ikea and talk about what furniture we will fill our house with some day. In fact, I even plan on using Ikea pieces as part of our wedding decor, such as Kardemumma pots and Blomster candlesticks.

However, there is one product in particular which I have been wanting for some time, but sadly now that my big day has come, I found that they have been discontinued. The Färm vases which I used to admire and long for every time that I went to Ikea are no longer available. Upon making this discovery, I immediately searched online to see if I could find these beautiful vases through another source, and I was shocked at what I found. No where on Amazon, eBay, or Craigslist was a single seller offering Färm vases. Yet a google search did show an extreme demand for them. Search results led me to hundreds of desperate customers searching for this exact product, especially brides-to-be each hoping to find 50 or more vases to complete their wedding decor. One particularly poignent example can be found at this popular wedding site, in which several brides arrange to ship a single set of much sought after Färm vases back and forth across the country every few weeks so that each can make these splendid products a part of their most important days.

I understand that business can be difficult, and I trust that trained experts made the decision to discontinue the Färm vases. But even with my small knowledge of economics, it seems to me that the demand far exceeds the supply. I don't know what the reasons were for discontinuing this product, but I do know that if it were in any way possible to start producing Färm vases once more, not only would it make thousands of customers extremely grateful, but I also believe we would be willing to pay whatever price is necessary to make it profitable to continue providing this magnificent product. Thank you.

Sincerely,

Kelli Wiswell


Sure it's a bit melodramatic, but my English teacher always told me that an emotional appeal is a very useful rhetorical device. via